

Yes, in almost every case, laptop battery replacement is the cheapest way to bring a slow, tethered machine back to life. If your laptop still meets your needs and is younger than about six years old, a new battery almost always beats buying a whole new laptop. Your next move: find the exact model or part number printed on the old battery (or in your service manual), confirm whether the pack is user-removable, and decide right now whether this is a DIY job or a job for a pro.
Before you touch a screwdriver, run through this quick triage:
- Flip the laptop over. Is there a latch or release switch holding a removable battery? That's a five-minute job.
- No visible battery panel? You're dealing with an internal pack glued or screwed to the chassis, which takes longer and carries more risk.
- Check the battery's charge level in your OS settings. Anything above 25% needs to come down before you open the case.
- Look for swelling, a puffed-out bottom panel, or a trackpad that no longer sits flush. That's a stop-what-you're-doing signal, not a DIY project.
Here's the safety order of operations, in sequence:
- Confirm the charge is at or below 25% (higher charge means higher risk if a cell is punctured during removal).
- Ground yourself with an anti-static wrist strap or by touching a metal surface.
- Unplug the laptop and remove any external power source before opening anything.
Pro Tip: Buy from a seller that publishes a compatibility guarantee and a real returns window, not just a part number in a listing title. A five-second fitment check now saves you a wasted week later.
Table of Contents
- How To Choose the Right Laptop Battery Replacement
- Is Your Laptop's Battery Removable or Sealed Inside?
- Step-by-Step Guide to Replacing a Laptop Battery
- How Do You Know Your Battery Actually Needs Replacing?
- What Does Laptop Battery Replacement Cost?
- Safely Disposing of and Recycling an Old Laptop Battery
- How AkkuPlus Verifies and Sources Replacement Batteries
- Get the Right Battery Fitted, Fast
- What To Do Right Now
- Sources
How To Choose the Right Laptop Battery Replacement
Buy the wrong voltage or the wrong connector, and no amount of careful installation saves you.
Start by pulling the exact specs off the old battery itself, or your laptop's service manual if the battery is sealed inside. You need five data points: model and part number (usually a string like "A1493" or "VGP-BPS35A"), voltage in volts, capacity in Wh or mAh, connector type, and physical dimensions. Photograph the old battery's label before you remove anything. It's easy to forget a digit from memory.
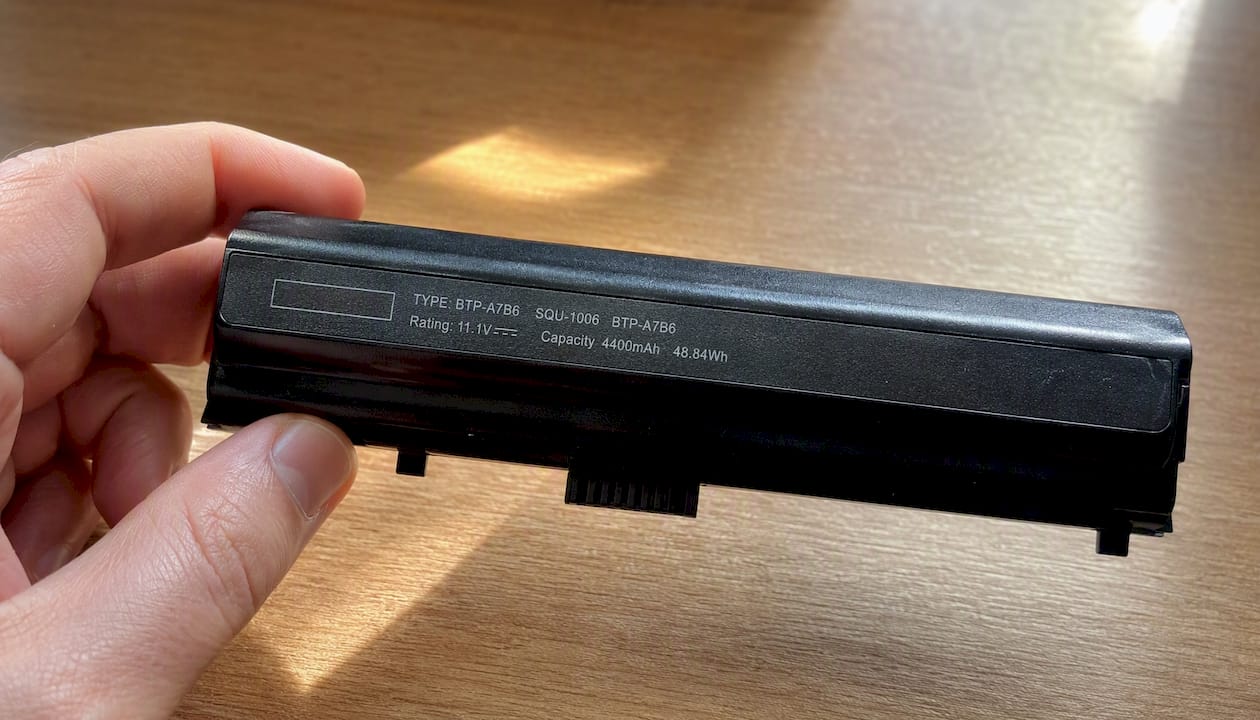
Compatibility matching works in a specific order. Match the part number first. If two sellers list different part numbers for what looks like the same battery, don't assume they're interchangeable. Then confirm voltage matches exactly and that watt-hour capacity is equal to or close to the original. A battery rated for a slightly higher Wh than stock is generally fine; a mismatched voltage is not something you can compensate for.
Some manufacturers use battery whitelisting or serialized parts that stop a non-OEM battery from charging or reporting correctly, even if the physical fit and voltage are right. Before you buy, check whether your model is known for this behavior and confirm the replacement is validated against it, according to iFixit's replacement guidance.
OEM batteries cost more but eliminate compatibility guesswork. Certified compatible batteries, carrying marks like CE, UN38.3 (required for lithium battery transport), or UL 2054, are a reasonable middle ground when they come from a seller who stands behind them with a real warranty. Suspiciously cheap listings with no certification marks and vague seller information are where counterfeit cells show up most often.
| What To Check | Where To Find It | Why It Matters |
|---|---|---|
| Part number | Old battery label or service manual | Wrong part number means wrong fit, full stop |
| Voltage (V) | Battery label | Mismatch can damage the motherboard |
| Capacity (Wh/mAh) | Battery label or spec sheet | Determines real-world runtime |
| Safety marks | Product listing | CE, UN38.3, UL 2054 signal tested safety |
| Warranty length | Seller's product page | Longer coverage signals seller confidence |
Look for sellers, like AkkuPlus, that list part number, voltage, and capacity clearly on the product page rather than burying specs in a generic description, since that level of detail is itself a sign the seller knows what they're selling.
Pro Tip: If a listing photo shows a battery connector that doesn't match your laptop's socket shape exactly, walk away. A close match is not a match.
Is Your Laptop's Battery Removable or Sealed Inside?
This single question decides whether you're looking at a five-minute swap or an hour-plus disassembly project.
Laptops made before roughly 2015 usually shipped with an external, latch-release battery you could pop out without tools. Most laptops sold since then, especially thin ultrabooks, bury the battery inside the chassis, held down with screws, ribbon cables, and often industrial adhesive. There's no universal rule tied to brand, so check your specific model. If you see a battery-shaped panel on the bottom with a slide switch or latch, you likely have the easy version. If the bottom is one solid panel held on by every visible screw, expect an internal pack.
Time and difficulty scale accordingly. A removable battery swap takes five to ten minutes and needs no tools beyond your hands. An internal battery replacement runs anywhere from 30 minutes to two hours, depending on how many components sit between you and the battery and how aggressive the adhesive is.
Internal replacements carry real risks a removable swap doesn't. Ribbon cables connecting the trackpad or keyboard often route directly over the battery bay, and one wrong pry can sever a connection that costs more to fix than the battery did. Some manufacturers explicitly void warranty coverage if you open a sealed unit, even outside the return window. If your laptop is still under manufacturer warranty, a professional swap through the manufacturer or an authorized shop protects that coverage.
Battery whitelisting deserves particular attention here: if your model is known to reject non-OEM packs at a firmware level, no amount of DIY skill fixes that. Confirm compatibility and firmware behavior before you order, not after you've already opened the case.
Pro Tip: Search your exact model number plus "battery replacement" on a repair community site before ordering anything. Five minutes of reading saves you from being the first person to discover a hidden screw under the keyboard.
Step-by-Step Guide to Replacing a Laptop Battery
This sequence covers the common case. Specific steps vary by model, so cross-check your service manual where one exists.
Before you start: Back up your data. Then check your current battery's health report (covered in the next section) so you know you're replacing the right part for the right reason.
Tools you'll want on hand:
- A precision screwdriver set (Phillips and Torx bits cover most laptops)
- A plastic spudger or opening tool (never metal, ever, near a battery)
- An anti-static wrist strap
- A small dish or magnetic mat to keep screws organized
- Replacement adhesive strips if your model uses glued-in batteries
Here's the sequence:
- Power down completely and unplug the charger. Confirm the battery is discharged to 25% or below.
- Ground yourself with the wrist strap before touching any internal components.
- Remove the back panel or battery hatch, keeping screws organized by removal order.
- Locate and gently unplug the battery connector from the motherboard before removing any fasteners.
- Remove screws or carefully release adhesive holding the battery in place.
- Lift the old battery out, place the new one in the same orientation, and reconnect the connector firmly.
- Reattach fasteners, replace the panel, and reassemble in reverse order.
Two safety checkpoints matter more than the rest. Never use a metal pry tool near a battery, especially one that shows any sign of swelling. If you find yourself fighting the case at any point, stop. A stuck panel usually means a hidden screw, not a battery that needs more muscle.
According to iFixit's safety guidance for DIY laptop battery replacement, discharging below 25% before opening the case is the single most effective step for reducing fire risk during removal.
Once reassembled, boot the laptop and confirm the operating system detects the new battery correctly. This first calibration cycle helps your OS report accurate capacity readings going forward. Keeping the laptop cool during this first week matters more for long-term battery health than obsessively unplugging the charger. Heat, not charge cycles, is the main driver of long-term degradation, according to Battery University.
How Do You Know Your Battery Actually Needs Replacing?
Don't replace a battery on a hunch. A few clear symptoms and two free diagnostic tools tell you whether the problem is really the battery.
Any visible swelling, bulging along the bottom panel, or a trackpad that's popped up from underneath is a hardware failure, not a software glitch.
Windows and macOS both offer built-in ways to check real battery condition rather than guessing:
- On Windows, open Command Prompt and run
powercfg /batteryreport. It generates an HTML file showing "Design Capacity" (what the battery could hold new) against "Full Charge Capacity" (what it holds now). - On macOS, check Battery Health under System Settings, or dig deeper in System Information under the Power section for cycle count and condition status.
- Compare the two capacity numbers directly. A meaningful gap between them tells the real story better than how the laptop "feels" day to day.
A simple field test also works: run a consistent task, like streaming video at a fixed brightness, and time how long the battery lasts compared to when the laptop was new. If your battery report or manufacturer utility shows a significant reduction in full charge capacity compared to the original design capacity, replacement may be warranted, according to guidance from Computer Compatibility's battery replacement resource.
If the battery won't hold a charge above single digits, refuses to charge at all, or shows any physical swelling, skip the diagnostic step entirely. Those are failure conditions, not degradation questions.
What Does Laptop Battery Replacement Cost?
Laptop battery replacement cost varies more by brand and battery chemistry than by capacity alone, but the range is predictable enough to plan around.
Budget-compatible batteries for consumer laptops are generally more affordable, with prices varying by certification, brand, and form factor, typically costing substantially less than a new laptop. In nearly every case, that's still dramatically cheaper than replacing the whole laptop, according to Pocket-lint's analysis of laptop battery economics.
If you'd rather not open the case yourself, Professional installation adds additional labor cost on top of the part, with varying prices depending on the complexity of the battery replacement and service provider
A useful decision rule when you're weighing a battery swap against buying new: if the full repair quote, part plus labor, comes in under roughly half the cost of a comparable refurbished laptop, replacement is almost always the better call. Battery-only repairs fall well under that threshold in the overwhelming majority of cases, according to a laptop repair decision guide.
Battery-only repairs are rarely where the "repair or replace" math gets close. It's when a screen, motherboard, or multiple components fail together that the calculation starts favoring a new machine.
Warranty terms differ meaningfully between OEM and third-party sellers. OEM batteries generally come with manufacturer warranties, and reputable certified compatible sellers provide warranty coverage and clear return policies as indicators of seller reliability
Safely Disposing of and Recycling an Old Laptop Battery
Lithium batteries don't belong in household trash, and a damaged pack needs specific handling before it ever leaves your house.
If your old battery is swollen or shows any sign of leaking, stop handling it more than necessary. Don't compress the pack, don't puncture it, and don't attempt to charge it again. Disconnect it from power if it's still connected, and set it somewhere stable and non-flammable until you can get it to a proper disposal point.
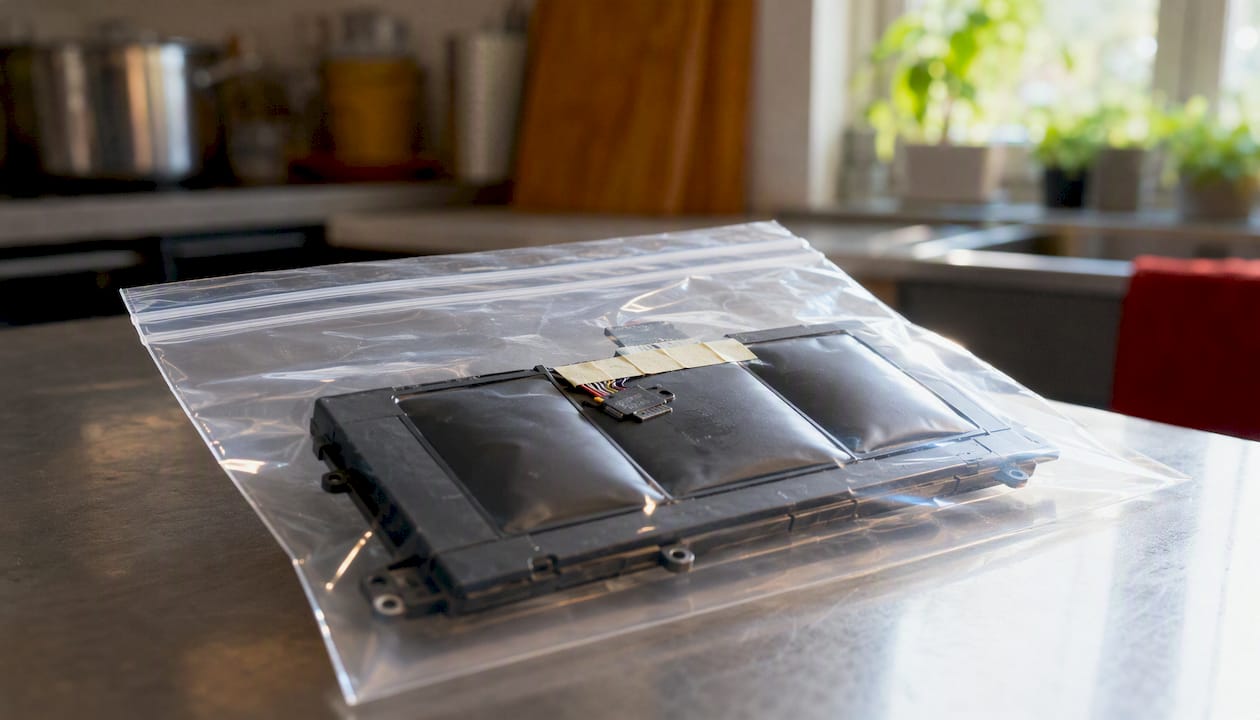
For a healthy battery you're simply retiring, preparation is straightforward: insulate the terminals with a strip of electrical tape to prevent short circuits, and place the battery in a plastic bag for transport. If the pack is damaged or swollen, many recycling centers ask that you label it as damaged so staff handle it with appropriate precautions.
Recycling options include local e-waste collection centers, retailer take-back programs (many electronics stores accept old batteries even if you didn't buy the replacement there), and municipal hazardous waste sites. Avoid household trash and standard recycling bins entirely. Lithium cells can spark fires in waste collection trucks and sorting facilities when crushed or punctured.
Regulatory pressure is also reshaping the space. Under Article 11 of Regulation (EU) 2023/1542, portable batteries will need to be removable and replaceable by users or independent professionals for new products, with those obligations applying from February 18, 2027, according to the European Commission's guidance on battery removability. Separate provisions also require spare batteries to remain available for at least five years after a product's last unit goes to market, according to the related Commission notice. If you're shopping for a laptop with future repairability in mind, that's a rule worth knowing about.
Pro Tip: If a battery is stuck to the chassis and won't budge, resist the urge to force it. A small amount of 99% isopropyl alcohol run along the adhesive seam, given a minute to work, usually releases the bond safely without risking a puncture.
How AkkuPlus Verifies and Sources Replacement Batteries
Trust in a battery seller comes down to specifics, not marketing language. Here's what a serious listing needs to show before you should hand over payment.
Every battery listing worth buying from should clearly state part number compatibility, exact voltage and Wh specs, and any relevant safety certifications, right on the product page rather than buried in a PDF you have to hunt for. AkkuPlus lists these details directly on individual product pages, including battery chemistry, capacity, and connector type, the same information you'd pull from a service manual, so you can cross-check before ordering.
Beyond straightforward sales, AkkuPlus also offers professional installation and cell-level repair services for batteries where a full replacement pack isn't necessary or available, including options like cell replacement for older telephone and cordless device batteries. For laptop owners uncomfortable opening a sealed chassis themselves, that kind of service closes the gap between "I found the right battery" and "it's actually installed correctly."
What to look for on any product page, whether you're buying from AkkuPlus or elsewhere: a fitment or compatibility checker, a stated warranty length, visible CE, UN38.3, or UL markings where applicable, and recent customer reviews that speak to real-world fitment rather than generic praise. If a listing is missing all four, that's a reason to look elsewhere.
If you're unsure whether a listed battery fits your exact model, contacting customer service directly for a fitment check before ordering beats guessing and dealing with a return later.
| Point | Details |
|---|---|
| Match part number first | Copy the exact part number from your old battery before comparing listings. |
| Certification marks matter | Look for CE, UN38.3, or UL 2054 marks on any non-OEM battery listing. |
| Removable vs sealed changes everything | A removable battery is a five-minute swap; a sealed pack can take up to two hours. |
| Warranty length signals confidence | Reputable sellers back compatible batteries with 12 months of coverage. |
| AkkuPlus lists full specs upfront | Product pages show part number, voltage, and capacity clearly for fitment checks. |
A Quick Note on Replacing Your Own Battery
Most laptops on the market today are strong candidates for a battery swap rather than a full replacement purchase. Replacing that one component is, in almost every case, the highest-value repair you can make on an aging but otherwise healthy machine.
Where I'd push back on the "just do it yourself" instinct: if your battery is visibly swollen, if the adhesive holding it in refuses to budge without force, or if your model is known for firmware-level battery whitelisting, a professional swap is the smarter call, not a failure of DIY nerve. Those are exactly the situations where a five-dollar part number mismatch or an aggressive pry tool turns a routine repair into a real hazard. Know which category your laptop falls into before you commit to a toolkit.
Get the Right Battery Fitted, Fast
Once you know your part number, the fastest path forward is buying from a seller that's already built for exactly this decision. AkkuPlus stocks batteries and cells across a wide range of devices, with part numbers, voltage, and capacity listed directly on each product page, so you're not guessing at fitment from a vague description.

Beyond the battery itself, AkkuPlus offers professional repair and cell-replacement services for cases where a straightforward swap isn't realistic, whether that's a sealed laptop pack, a whitelisted battery, or a device where sourcing a full replacement unit isn't practical. If your old battery needs replacing rather than repairing, browse listings like the Panasonic CGA-S007 replacement pack to see how specs and compatibility details are presented, or head straight to AkkuPlus's main site to search by your exact model or part number and check current warranty terms before you buy.
What To Do Right Now
Battery replacement restores most laptops to full mobility at a fraction of the cost of purchasing a new machine, provided compatibility is confirmed before ordering.
Your immediate to-do list:
- Find and photograph the part number, voltage, and capacity on your current battery or in your service manual.
- Run a battery health check (
powercfg /batteryreporton Windows, Battery Health on macOS) to confirm replacement is actually justified. - Decide DIY versus professional based on whether the battery is user-removable and whether you're comfortable opening the chassis.
Once you've made that call:
- Buy an OEM or certified compatible battery from a seller with a clear warranty and returns policy.
- Follow the discharge-to-25%-and-ground-yourself safety sequence before opening anything.
- Recycle your old battery through an e-waste center or retailer take-back program, never the trash.
Sources
- How Do I Replace a Laptop Battery Safely at Home? Complete 2026 DIY Guide
- How to prolong lithium-based batteries — Battery University
- Commission Notice — Guidelines on removability and replaceability under Regulation (EU) 2023/1542
- Is it worth replacing your laptop battery?
- Repair or Replace Your Laptop? 2026 Decision Guide